Getting braces can be a pretty traumatic experience for a student who plays the flute. I have had kids come to their lessons in tears after getting braces, swearing they would never be able to play the flute again. It is always nice to be able to send them home happier, with an understanding of what they need to do to regain their tone and maybe even having recovered most of their tone within the span of a lesson.
What do you need to know to help your flute students adjust quickly and easily to playing the flute with braces? Like everything else that has to do with flute embouchure, it is about learning to direct the air properly. When there are braces in your mouth, everything you thought you knew about how to direct the air has changed.
First, it is important to get your lips out and around the braces so the aperture can be shaped again. It is going to take some experimenting to discover how to do this. Most kids find they now unable to bite, pull or pinch the corners with all the hardware in their mouth. This is a good thing, since they shouldn’t be doing that anyway! If you engage the corners of your lips by using your cheek muscles, it causes a host of problems that affect the quality of flute tone including:
- You limit the ability of your top and bottom lips to move independently of each other, which restricts control of register, dynamic and intonation
- You stretch the lips, which limits the ability to control how the airstream is directed, resulting in too shallow a blowing angle and generally breathy tone.
- You diminish the fleshy cushion of your bottom lip against which the air needs to travel, creating an edgy, thin tone.
It can be useful to practice blowing through a narrow coffee straw so they can understand how to shape the aperture again.
Students often find it helpful, at least initially, to use dental wax to keep new braces from cutting the inside of their lips. I also often recommend trying Morgan Bumpers. These aren’t for every flute player because it adds a little more thickness, but some students like them, especially on the bottom brackets. It is economical to try and worth considering.
The next issue to be grappled with is the difference in blowing angle. Many kids can discover their new blowing angle through trial and error with some guidance. They need to be reminded that the object of the experiment is to figure out how to direct the air at the blowing edge again. In general, we direct the air down at about a 45 degree angle towards the blowing edge. Experiment with putting the flute a little lower on the chin. The blow hole should be covered by the bottom lip approximately 25% to 30%. It is also useful to have the students work with the PneumoPro to visualize the blowing angle as well. Remember that the top and bottom lips need to be able to move independently so you can change the direction of the air.
A mechanical solution that can help many kids, at least initially, is to layer either masking or blue painter’s tape on the edge of the lip plate that rests against the chin to adjust the blowing angle without covering the blow hole. Figure out how much tape is needed by adding one layer at a time, up to 5 or 6 layers. For some kids, this may be all the intervention that is needed initially. I would suggest helping them wean themselves off of using the tape over the course of a month or two and to experiment on their own with lip flexibility and blowing angle.

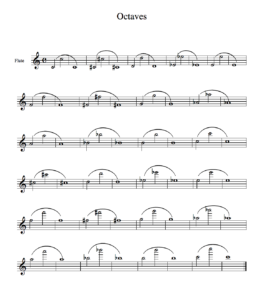
Finally, some slow and thoughtful practice on Octaves and scales go a long way to help students get their bearings again on the flute with their new embouchure. It’s not necessary to resign yourself to poor tone from your flute players during the time they are wearing braces. It does take some extra guidance and encouragement to help them over the initial hump when they first get the braces. With the right guidance, they should rediscover their tone within a few weeks at most. In many cases, the student is able to figure it out within a couple days, or even sooner.
The good news is on the other end, when the kids get their braces off, it is usually a much easier transition. And by this time, the kids have some tools to deal with the change of blowing angle because they’ve already been through it before when they got the braces on.
Dr. Cate Hummel is a flute performer, scholar and teacher based in the Chicago area. She presents and performs around the US and internationally at music conferences, clinics and conventions. She is passionate about helping kids play the flute well and helping school music directors understand how to teach the flute more effectively to their students. Originally from the East Coast, Dr. Cate has a DMA and MM from the Manhattan School of Music and a BM from the Philadelphia College of Performing Arts (later the University of the Arts). She’s been in the Chicago area for more than twenty years, where she has a large and successful private studio, teaches private lessons in public schools and has taught at several colleges as an adjunct professor of flute. Currently, she is Adjunct Professor of Flute at the University of St. Francis in Joliet, IL. You can view extensive articles about flute pedagogy and contact Dr. Cate through her popular website Dr. Cate‘s Flute Tips, drcatesflutetips.wordpress.com
Related Reading:
The Fine Art of Flute Legato (Also by Dr. Cate)
Learning to Play the Flute in Tune (2 part series)
Rhythm Envelope Game for Beginning Band
A Note Before a Rest… (Quick Tip)
If you would like to receive our weekly newsletter, sign up here.
Don’t forget to like us on Facebook too!
Learn. Share. Inspire.
BandDirectorsTalkShop.com


Leave a Reply
You must be logged in to post a comment.