The population of learners in our ensembles is becoming increasingly diverse in many ways, including how they learn best. For some students, a disability or diagnosis may affect their learning. Others who do not have a disability or diagnosis may just learn in ways that are unique and that require support in order for them to be successful. This leads to classes and ensembles that include a very wide range of learning schemes, and to teachers and directors who struggle to ensure that every student can engage, participate, and learn effectively.
This is where Accessible Music Education comes in! Accessible Music Education is a set of principles, habits of mind, and strategies to help educators reach and teach every student, no matter how they learn best. In this article, I’ll share three very effective strategies from Accessible Music Education that you can implement right away in your teaching practice. Using these strategies will make your ensembles, lessons, and classes more accessible for every student.
Strategy One: Make Structure and Schedule Consistent and Transparent
One key way to make your classes more accessible is through clear, consistent, and transparent structure. This strategy helps to alleviate student anxiety and ensure that students feel safe and ready to learn.
Provide the students with the plan or schedule for the class on the board, and keep it visible the entire time. Refer to it as you go, with statements like, “We just did our warm up. Now we’re going to go on to [name of first piece on the agenda]. Making sure that students know that there is a plan for their time with you, that it makes sense, and that you will follow it creates an environment that is consistent and dependable for all learners.
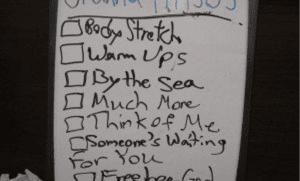
The photo below is of a schedule for a private voice lesson for a musical theater student. The instructor used the agenda by asking the student to check the box after they completed each item.
Another kind of structure to attend to is the overall flow of the class or rehearsal. When possible, keep the beginning, middle, and end of a session consistent. For example, for a band rehearsal:
Beginning: students enter, get their music, set up their instruments, warm up individually, and warm up as a group. Then there are announcements from the teacher.
Middle: students work on pieces and sections of pieces
End: students play something that they know well and with which they can be successful. There are closing announcements. Then the students put away their music and pack up their instruments.
Of course, the beginning, middle, and end of rehearsals will be different at certain times of the year, such as right before or right after a performance, for example. But keeping the overall flow of the class consistent most of the time will help students to know what to expect when they are with you, and that will help to make the sessions more accessible for them.
By increasing the clarity and consistency of the structure of your class meetings, you open up access for all learners. Your students will be more engaged and more willing to participate in a safe, predictable learning environment.
Strategy Two: Use Visuals
One of the easiest ways to make your rehearsals more accessible for all learners is to increase the use of visuals in your teaching. Visuals are particularly powerful because they perform two functions simultaneously:
- They are a teaching and learning modality, meaning that they are a way that information can be shared; and
- They act as a form of support. When information is shared with visuals, it sticks around after it has been used. This allows students to use the visual form of that information if they need support.
Let’s say that you’re giving instructions verbally to the students, and you have the instructions written on the board, as well. Because the writing on the board will continue to be there after you’ve said the instructions, it functions as a support for students who might need it. Perhaps a student takes longer to process information. Or maybe they were distracted when you spoke the instructions. Or maybe English is not their first language. In all of these – and many more – cases, the visual form of the information makes the learning more accessible for all students.
Visuals do not have to be anything fancy. They can be something that you write on the board, or a simple handout. They just need to communicate the information that you want the students to know and understand.
In the photo below, I am using a visual about Universal Design for Learning while I am teaching a college class.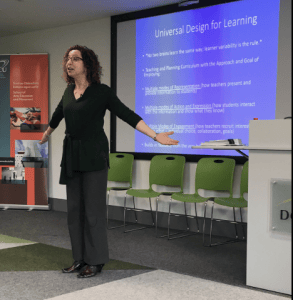
Strategy Three: Assess Students in More than One Way
In the arts, assessment often takes the form of, “You know it if you can do it.” In music, that generally means that students tend to be assessed based on what they can play or sing. However, learning and understanding take many forms. Some students might understand a concept without being able to show it on their instrument just yet. Some students might know what they wish to do with their instrument, but they need more time to get that into their bodies. Instead of being assessed solely on their ability to play what they have learned, students might be able to show what they know and are able to do by clapping, moving, singing, writing, or analyzing.
This is true with other forms of assessment, as well. Some students can demonstrate their knowledge very effectively in paper and pencil tests, but others cannot. They may have learned very well and understand the material, but are not able to communicate their learning through writing their responses by hand. These students could benefit from using notation software, or from recording themselves speaking their responses rather than writing them.
If we assess our students in only one way, we miss the opportunity to see, acknowledge, validate, and celebrate some students’ learning. Rather than giving just a single assessment, use multiple forms of assessment. When possible, provide students with the opportunity to choose how they will be assessed. For example, they could take a live playing test, submit a recorded self assessment, or hand in a composition. Or they could choose between taking a test by writing their answers and using music technology or manipulatives for their responses.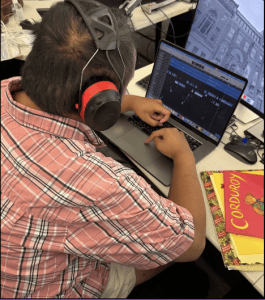
The student in the photo to the right is working on an arranging project for his assessment. Students in his class had the option of presenting a performance or creating their own arrangements to demonstrate what they had learned.
When we center accessibility in our teaching, we open up learning opportunities for everyone. These above strategies are a great way to begin your efforts to attend to accessibility in your classes, lessons, and rehearsals. They are simple tweaks that you can implement right away to reach and teach all of your students more effectively. And more than that, they are all elements of good teaching that will make your work as a music educator and band director more effective for every student you meet, no matter how they learn best.
Dr. Rhoda Bernard is the Founding Managing Director of the Berklee Institute for Accessible Arts Education and the Assistant Chair of the Music Education Department at Berklee College of Music. An internationally renowned expert in accessible arts education, Bernard regularly presents keynote presentations and research at conferences throughout the U.S. and abroad, and she provides professional development workshops for educators in local, national, and international forums. Her book, Accessible Arts Education: Principles, Habits, and Strategies to Unleash Every Student’s Creativity and Learning was published in September 2025. An active arts education advocate, Bernard is the immediate past chair of the Arts Education Advisory Council of Americans for the Arts, and she serves on their speakers bureau.


Leave a Reply
You must be logged in to post a comment.