How to Teach Four Mallet Grip to your Percussionist
Four mallet marimba playing is becoming increasingly prominent in the hands of young percussionists. They must certainly be comfortable with simple techniques if they are to be successful at the All-State audition etudes which include a four mallet etude. Ideally, the “Stevens” technique should be taught towards the end of the beginning year. Using the last few days of school during instrument check-in and locker clean out would be a good time. This will give your students more to practice over the summer and give them more to look forward to as they return from summer vacation.
For this setup you don’t need music, a keyboard, or even matching mallets!
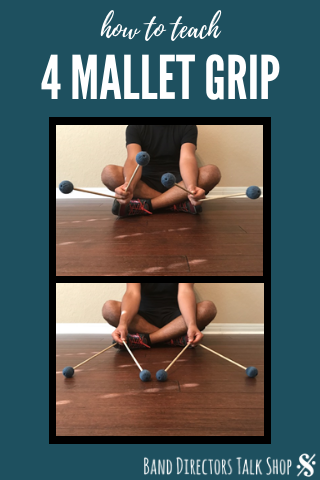
Step 1: Gather students in a circle and make sure each of them has a set of four mallets. They do not have to be the same type but the same length is preferable.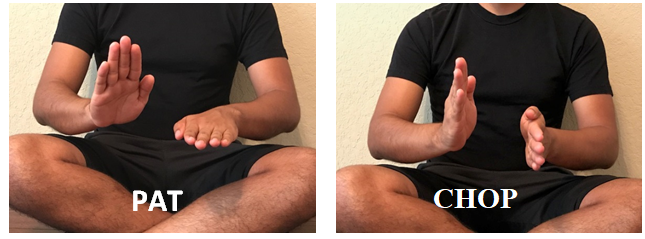
Step 2: Students MUST understand that in four mallet playing, your wrist will move in a “chopping” motion instead of a “patting” motion.
Checkpoints:
– Palms are facing each other.
– Knuckles are stacked vertically.
– Thumbnails are facing the ceiling.
Inside mallet

Step 1: Show your kids Spiderman’s web launch! Take a mallet and place the tip end of the mallet in the center of your hand and place the tip of your middle finger on the mallet to anchor it down. The mallet should then be tucked underneath the fleshy part of your hand. The middle finger DOES NOT wrap around the mallet.
Step 2: The mallet will now rest on your “trigger finger” on top the first knuckle. Then, rest your thumb on top. This will create your fulcrum that you know and love from match grip. The two fingers should create a “T” shape. No need to worry about the ring and pinky at this point.
Outside Mallet
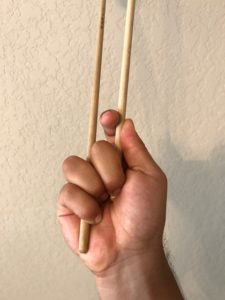
Step 1: Take the other mallet with your free hand and place it between middle and ring finger (this one your fingers DO wrap around.)
Step 2: Leave about half an inch to an inch sticking out of the hand. All students will have different size hands so adjust accordingly.
Step 3: Once in the hands, let the mallets drop to the floor and begin the process again starting from the inside mallet, step by step.
The Left Hand
Step 1: Have your students teach their left hands how to hold the mallets just like we showed them with the right hand. Once again, step by step.
Final Prep
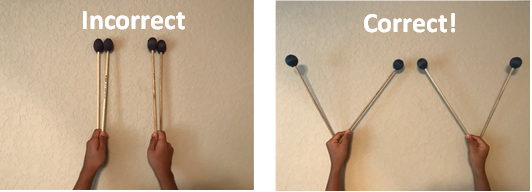
Step 1: Hold the mallets firmly. The small muscles in your fingers will be a little weak since you haven’t used these muscles in this capacity before.
Note: the mallets will not be parallel and the heads will not be even.
Step 2: Lower the hands and press down on the floor so that the mallets will become even. Then lift with the wrist and try to keep them aligned. Remember to move your wrists in the “chopping” motion and not “patting.”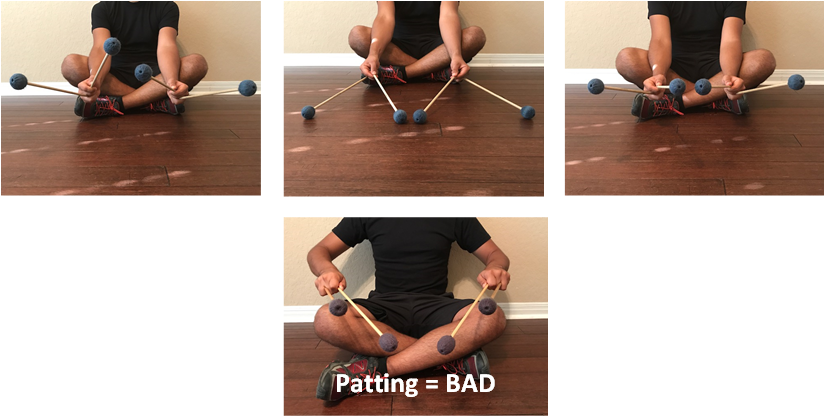
Step 3: Release the mallets from your hands and let them drop to the floor. Stretch out your fingers and repeat the entire process a few times before introducing this technique to the keyboard or music.
Rick Astorga received a bachelor of music degree from Texas State University and is the Associate Director of Bands and the Director of Percussion at William Howard Taft High School in San Antonio. He is a member of the Texas Music Educators Association, the Texas Band Masters Association, the Percussive Arts Society, the National Association for Music Education, and is an endorser and a member of the Education Team for Vic Firth.
Related Reading:
4 Ways Tape Can Help Your Beginner Percussionist
Five Minute Drill – Fun Classroom Routines for Percussion
Teaching Snare Drum, Day One
If you would like to receive our weekly newsletter, sign up here.
Don’t forget to like us on Facebook too!
Learn. Share. Inspire.
BandDirectorsTalkShop.com




Leave a Reply
You must be logged in to post a comment.