This is a quick step guide for the band director to teach the perfect crash cymbals from the podium. There is more to cymbal crashing that meets the eye.

Proper Set-Up
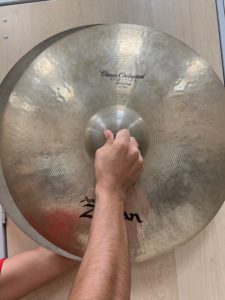
Grip
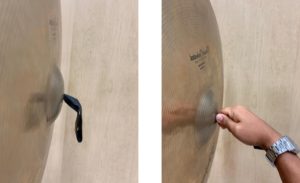
First and foremost, the player must know how to grip the cymbals properly. What is not recommended is putting your hand through the loop of the cymbal strap and resting your hand on the cymbals. Your hand will act as a dampener and will stop the cymbals from vibrating at their full capacity.
Instead, the correct way is to grip the cymbal strap completely as though you are gripping a drumstick. “Pinch” with the fulcrums and fully wrap the fingers around the base of the strap.
Right and Left Cymbal?
Yes, believe it or not, just like a set of hi-hats, the individual crash cymbals are assigned to top and bottom. Normally, the heavier and lower-pitched cymbal will serve as the foundation. The higher-pitched cymbal will be used on top. You can determine this by tapping the cymbals together in order to get them to vibrate. Then hold them up to your ear one at a time. You should be able to hear them “hum.” Next, determine which pitch is the lower one. This will be your bottom cymbal and will be held by your non-dominant hand.
Playing Position
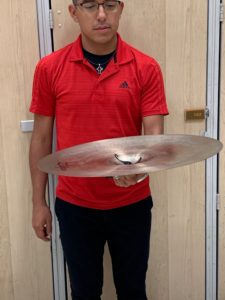
Now that you are gripping the cymbals in the correct hands, we can now create our playing position. Stand with your feet shoulder-width apart and lift your left cymbal or bottom cymbal up as if you are serving a tray of hors d’oeuvres.

Now, rotate the cymbal clockwise so that it is at a slight angle.

Next, take your right-hand cymbal, face it down, and have it hover just over the bottom cymbal. Notice, this cymbal is not as steep an angle as the bottom cymbal.
As you crash the cymbals, they will hit each other slightly off-center. If they hit completely in-line, it will create a suction or air pocket and will not produce a full sound. You would also run the risk at “inverting” or cracking the cymbals.
The Crash
As mentioned before, the cymbals should connect slightly off-center. When holding them together, you should be able to see a small crescent shape that the bottom cymbal makes shown here.
From the playing position, simply drop the top cymbal in the same motion and speed as a “rebound stroke.” If the cymbals are set up properly, you should be able to hear a flam sound or “ca-ching.” This is because the top end of the top cymbal is making contact with the bottom cymbal first.
The left cymbal will also be raised in order to meet the top cymbal halfway. But, the main motion and initiation will come from the top cymbal. Continue to repeat this motion making a quicker rebound stroke each time. You will begin to hear the characteristic “crash sound.”
Playing Tips
- Pull the cymbals in against your body in order to cut off the sound for staccato notes.
- After crashing, keep cymbals in the playing position. Vibrations come from the edge of the cymbals, so if extra ring is needed simply lift the left cymbal up by the strap.

- Only more velocity is needed for louder crashes, not necessarily a greater distance between the cymbals.
Types of Cymbals
- French–Light, thin cymbals that have a fast attack and short sustain. Good for faster passages and circus marches. Typically 16″-20″ sizes.
- Viennese–Medium weight and thickness or medium heavy, 16″-20″. Typically your general cymbal which produces a full sound, medium response and sustain. Good for overall playing.
- Germanic–Thick and heavier cymbals with strong articulation and long sustain. Not recommended for soft passages. Typically 18″-22″ sizes. Good for single loud crashes and all things Wagner!
Cleaning Cymbals
Keeping dust, dirt, acid, and tarnish off of the cymbals will help them maintain their new look and sound. Teach your students the importance of cymbal maintenance and encourage them to not touch the cymbals any more than they need to. At least once a year, you should look into cleaning all of your cymbals. That being said, the perfect cymbal cleaner does not exist. Cymbal manufacturers may produce cymbal cleaning products but most of them are meant for cymbals with a “brilliant” finish (ex. Zildjian A Customs).
What is not recommended are home remedies such as ketchup, orange juice, Windex, Comet Cleaner, soda, Brasso, or silver polish. However, “Liquid Bar Keepers Friend” is the best overall product used to clean and maintain cymbals with a traditional finish. This is a soft cleaner that is delicate with the metals and removes tarnish on the surface. When cleaning, go easy over the logos and wash and dry thoroughly to prevent any discoloring. After polishing, you will notice a much clearer and resonant sound from your cymbals.
Rick Astorga received a bachelor of music degree from Texas State University and is the Associate Director of Bands and the Director of Percussion at William Howard Taft High School in San Antonio. He is a member of the Texas Music Educators Association, the Texas Band Masters Association, the Percussive Arts Society, the National Association for Music Education, and is an endorser and a member of the Education Team for Vic Firth and endorses Zildjian Cymbals.

Related Reading:
Tambourine 101
Common Match Grip Problems for Beginning Percussionists
How to Teach 4 Mallet Grip
If you would like to receive our weekly newsletter, sign up here.
Don’t forget to like us on Facebook too!
Learn. Share. Inspire.
BandDirectorsTalkShop.com


Leave a Reply
You must be logged in to post a comment.