I know stringing a horn valve may seem very intimidating to a non-horn player, but it is really quite easy. In fact, it’s easy enough for an upper middle school horn player to do by themselves. With a little practice, you will be able to string a valve in 5 minutes or less!
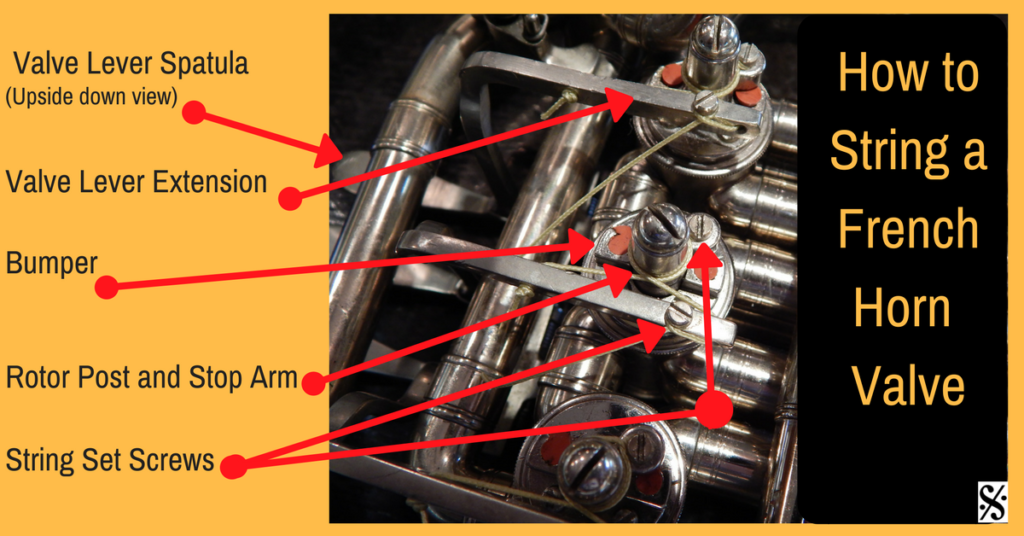
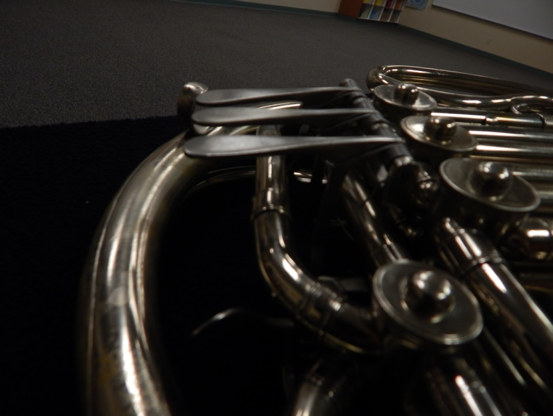
First, let’s talk about the parts of the back of the valve. The valve lever extension is attached to the valve levers spatulas. The stop arm is on the backside of the valve and rotates when the valve lever spatula is moved. The bumper controls how far the stop arm travels allowing the valve to open and close properly. There is a string set screw on the stop arm. The end of the valve lever extension has a hole and string set screw. Here is a labeled photo of the back of a horn so you can see all the parts. I drew arrows on 2 different valves to make it a little easier to see.
Step One
Gather all your supplies.
- Horn string (it can be purchased at your local music store, horn specialty shops, and online music stores.) I like horn string that is not pre-cut into lengths. The pre-cut is sometimes is too short making it more difficult to work with. I always use a longer piece of string than is actually required to string the valve.
- Small, flat head screwdriver (like the ones that come in this Screwdriver Set
.) I like having different size screwdrivers because certain brand horns have different sized screw. (See sample here – Rotor Valve String
)
- Scissors
Step Two
Cut a generous, about 7 to 8 inches, length of string. Loosen the set screws and remove the old string. Do not remove the set screws, just loosen them.
Step Three
Tie a double knot in 1 end of the string. A double knot will ensure that the string doesn’t pull out later. Thread the plain end through the ‘top’ hole of the valve lever extension. Begin threading through the hole starting on the side opposite the valve. The knot must be on the side of the lever extension opposite the actual valve. If you have difficulty getting the string to easily go through the hole, cut the end of the string on an angle. Pull the string taut.
Step Four
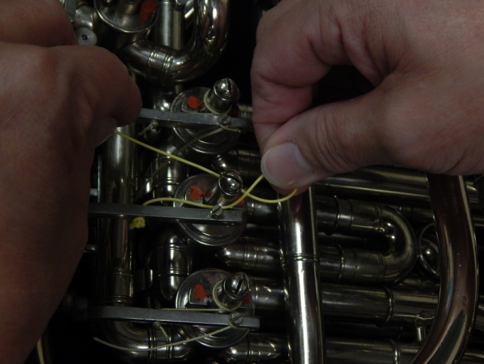
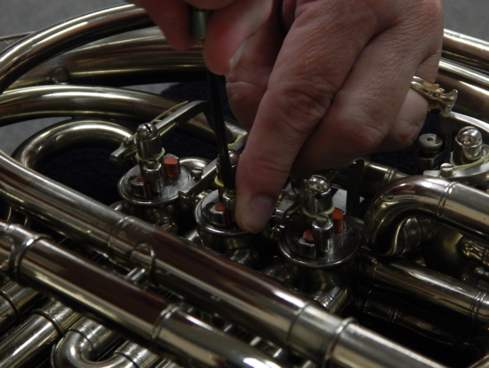
Run the string between the valve lever and the rotor post. Wrap the string around the ‘bottom’ of the rotor post. Make a loop and turn the knot over so it is face down around the stop arm post set screw. (Photo 4A) Pull the string taut while you hold the stop arm firmly against the bumper. Be sure to double check to make sure all valve lever spatulas are level. Tighten the set screw. (Photo 4B) The string will shorten as the screw tightens, that’s normal. To adjust the height of the valve lever spatula, loosen the set screw and slightly adjust the amount of string needed for the correct valve spatula height even with all the other levers. (See photo 5B.) Tighten the set screw. Repeat this step if necessary before going to the next step.
Wrap the string around the ‘top’ of the rotor post of the stop arm and thread through the hole at the end of the valve lever extension. Make a loop and turn the knot over so it is upside down under the set screw. Pull the string taut. (Photo 5A) Be sure to double check to make sure all valve lever spatulas are level. (Photo 5B) Tighten the set screw. Trim the string leaving about 1 inch of string.
Step Six
Press the valve lever up and down to make sure this is no slack in the string as the stop arm moves back and forth and to make sure the screws are tight enough. If there is some slack, don’t take the string off. Loosen the set screw in Step Five, pull the string taut, and then retighten the set screw.
Other Tips and Tricks
- If a screw won’t tighten because the threads have been stripped, remove the screw and place a tiny drop of clear nail polish on the screw. Let it dry. Put screw back into the hole then string the valve.
- If the end of the strings fray, burn the end with a lighter or apply a thin coat of clear nail polish.
- One last tip I want to share with you. Have your students oil their valves everyday! Strings usually break or come loose because students go weeks, semesters, or even entire school years without oiling the valves! Just kidding! Seriously though, daily oiling of the valves is a great way to keep you from having to string a horn valve.
- If you need additional help or want to watch a demonstration, the internet has many very good, informative articles, diagrams, and videos on how to string a French horn valve.
Next time you have a horn player with a broken string, you don’t have to send it to the repair shop! You can easily string a valve during your conference period. And we all know it usually happens just before a performance! Good Luck!
Becky Casso is a passionate music educator. Her teaching career began in the band hall directing bands in the Borger, Klein, and Canyon school districts. She is a highly sought after horn instructor and has presented master classes and workshops in Amarillo ISD, Canyon ISD, and West Texas A & M. She performs with Chamber Music Amarillo, Amarillo Symphony, Amarillo Opera, and with other chamber groups in Amarillo. Becky has been recognized as the Canyon ISD Teacher of the Year, Region 16 Texas Teacher of the Year, and was recipient of the University of Texas Exes Association’s Teaching Excellence Award.
Related Reading:
Helpful Horn Hints (Part 2) – 3 Places to Oil French Horn Valves
Utilizing Sound Concepts When Teaching Brass
10 Tips for Improving Accuracy on the Horn
Diagnosing Brass Tension and Helping Students Achieve a Better Sound
If you would like to receive our weekly newsletter, sign up here.
Don’t forget to like us on Facebook too!
Learn. Share. Inspire.
BandDirectorsTalkShop.com





Leave a Reply
You must be logged in to post a comment.