When I was a beginner back in 1995 I remember my band director trying to teach us concepts of sight-reading new music. So, cue in the good old trusty rhythm charts and clapping sessions. Somehow this very common way of teaching music was supposed to transfer to learning music on our own. However, it usually turned into a rote teaching session of clapping some rhythms and then playing what we clapped. But, was that all there was to it or was there more missing? Were students really learning through counting and clapping? I often felt that there were too many questions between what I saw on the page and what came out of my instrument.
Fast forward to 2005 and me as young band director. When the time came to introduce new music to my students I first went with the formula of clap, count, and play. It wasn’t long until I became frustrated when my students couldn’t play as well as they counted/clapped. I soon discovered this formula was not a deep enough approach to long term music learning and started to add to the process. As I added and discovered different strategies to my daily rhythm charts AND music pieces, I noticed my students understanding and applying these strategies themselves and doing more independent music reading. Then, after a while, these strategies became so ingrained in my students that they no longer said that dreaded sentence all band directors cringe to hear: “How does it go?” – because they knew the steps to figure it out. Here are 9 proven strategies for teaching students long term music reading skills:
1. The 15-second scan
Start by giving your students designated time to look at the overall exercise or measures they will be reviewing. Have students look for time signatures, key signature, accidentals, complex or new rhythms and fingerings. Let them have an overall big picture at the task coming up.
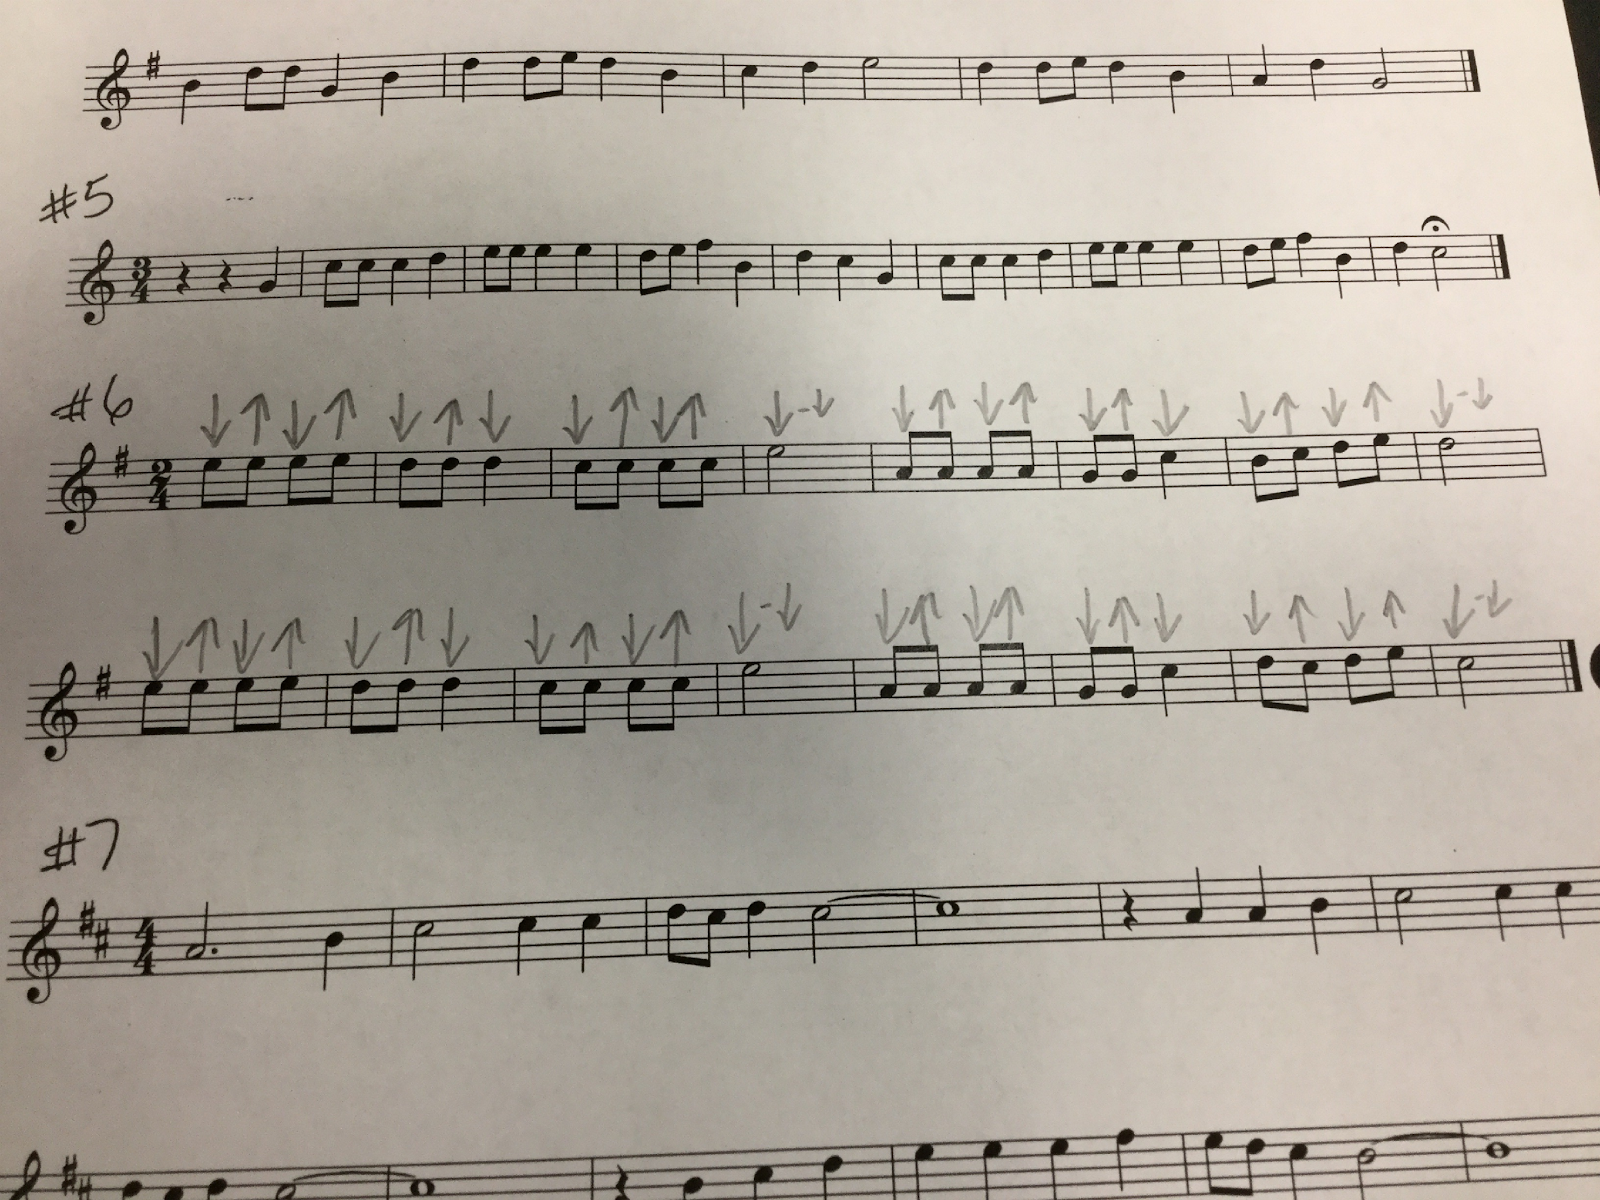
2. Writing in and saying foot tap/beat direction
Before starting any counting system, I always start with the basic beat. We have students write in their music where the down and up beats are. This, to me, is probably the most important strategy of the nine. Students must know how to figure out where the down and up beats are in every measure. Too many times we get caught up in our counting system and neglect the foundation of rhythm. I teach this first before any counting system can be introduced. Instruct students to label the down and up beats on top of each note over the staff. Big arrows for main beats and small arrows for beats inside a note. For example, if there is a quarter note in 4/4 time on beat 1, then there would be a large down arrow and a small up arrow. For rests, we will simply add a diagonal line crossing the arrow(s) out. We do this so students can see that, although the rest is silent, it still has a place and a pulse in our music. For longer notes, like a half note in 4/4 time, we would have one big down arrow, one little up, one little down and another little up. As a short cut for notes longer than 1 beat, I do 1 big arrow, a dash (-) and a small down arrow.
3. Write in your counting system
This section is not about what counting system is best. Rather, the best counting system is a consistent one with your feeder schools. Counting systems must be discussed and be vertically aligned from 6th grade to high school. Once students clearly understand down and up beats, start adding your counting system on the bottom of the staff directly below the notes. For notes longer than 1 beat, I teach to include a dash. (ex. 1-2-3-4 for a whole note).

4. Say the articulation style
I have been fortunate to have remarkable elementary music teachers in my district. But for many years, I completely neglected all that they taught my 6th graders in the previous years. Later, I noticed that my beginners already came with a counting system. Although it wasn’t the one I would use, it was extremely valuable especially for wind playing. The ta-ta, ti-ti system was perfect and easy to implement into our strategies. After students could identify and write in down/up beats and implement a counting system, it was then time for them to say the articulation style. All I did was bring back their knowledge from elementary school and apply it to learning a new piece of music. Whole notes, we used the syllable “toh”, and half notes “te”. Notes that are 1 beat, like a quarter note, we use “ta”. Eighth notes “ti” and sixteenth notes “ti-ki-ti-ki”. The articulation style for our sixteenth notes was also a huge help to introduce double tonguing at the end of their 6th-grade year and beginning of their 7th-grade year.
5. Say the letter names
This strategy of students saying and singing the letter names in tempo, pitch and in rhythm is one of my favorites. In fact, it’s a quick strategy to put in rhythm, articulation and pitch matching into one. We even say the flats and sharps if they call for it.
6. Say the fingerings/sticking
In this strategy, we go a step further by having students say the fingerings or sticking. For percussion, we have students say right and left as they go through the line. For brass players, we position numbers and/or valve combinations. When it comes to woodwinds, we use things like the “thumb one” or “top pinky” or other key reminders when going through the line.
7. Show the air direction (for flutes and brass instruments)
This strategy I use for flutes and brass instruments. For flutes, we stretch out our arm and point to the angle our air will go as we say letter names. For the brass, I have them put their hand in front of them and have them angle their hand as they blow to their hand. For low notes, their hand and air stream will be slightly up. For higher notes, their air stream and hand will be angled down. This also helps as a visual representation of where they think the air stream is and it is easy to compare themselves to the rest of the class.
8. Air, tongue, and keys
Students really like this strategy out of all of them. This uses all the motions they will use to play but without the sound. This strategy takes the fear about making any mistakes and they get to do a “test drive” of the piece or line they are sight reading. In this strategy, we can re-enforce or concentrate on airspeed, tonging/articulation and check fingerings without the sound.
9. Buzz it for brass/sing for Woodwinds and Percussion
Finally, the last strategy is buzzing for brass. I have students buzz on their mouthpiece or put it on a B.E.R.P. as they match pitch while I play or use the piano for pitch reference. Make sure brass students are matching the pitch of the line. Slow it down if you need to, but be relentless that they are matching pitch. Do the same with the other musicians singing or humming the correct pitch. Don’t have students just go through the motions.
THEN PLAY IT!
Christina Benitez is in her 15th year as a band director and has taught 12 of those years in low-socio economic schools. She has had many successful experiences at the high school and middle school levels. She is a two-time Latin Grammy winning producer and audio engineer for Best Children’s Album in 2013 and 2015. Currently, she is the band director at Wertheimer Middle School in the Lamar CISD district in Rosenberg, Texas.
Related Reading:
“Out of the Box” Rhythm Exercises
What’s Your Breathing Plan?
Want Your Band to be Better at Sight Reading?
If you would like to receive our weekly newsletter, sign up here.
Don’t forget to like us on Facebook too!
Learn. Share. Inspire.
BandDirectorsTalkShop.com


Leave a Reply
You must be logged in to post a comment.