Teaching flute vibrato is a crucial aspect of developing flute players. This post gives a step-by-step to introducing the youngest players to the basics of vibrato.
Step 1 – Teach students to pulse their sound.
This is a critical step! Teach them breath impulse as soon they are ready. Be sure they pulse with their air from their core muscles. You should demonstrate this to them – either on flute or on your primary instrument.
Step 2 – Teach students to do a compound foot tap. (Down-Press-Up)
This prepares them for divide the foot tap 3 ways for compound time signatures like 6/8 and 12/8.
They should tap:
Down – foot is completely flat on the ground
Press – toe is still down, heel is up
Up – toe is up, heel is down.
Have them do this first while they just say “down, press, up” then they can clap and tap their foot. Then they are ready for the next step.
(Read a full post on teaching compound foot tap here!)
**Students must master the compound time foot tap – Down,Press,Up – before proceeding to step 3. Begin teaching this foot-tap at least 2 weeks prior to beginning Vibrato Exercise #1.
Step 3 – Introduce Flute Vibrato Exercise #1

Click picture to enlarge.
Things to emphasize:
– do this DAILY as part of your daily exercises
– big, strong pulses – It should sound “like the room is quaking” like an earthquake. That’s how strong we want the pulses to be.
– It’s not a flutter but a pulse. A throbbing vibrato
– fast air
– breathe at the bar lines
– be sure they are using down-press-up foot tap
Step 4 – Introduce Flute Vibrato Exercise #2
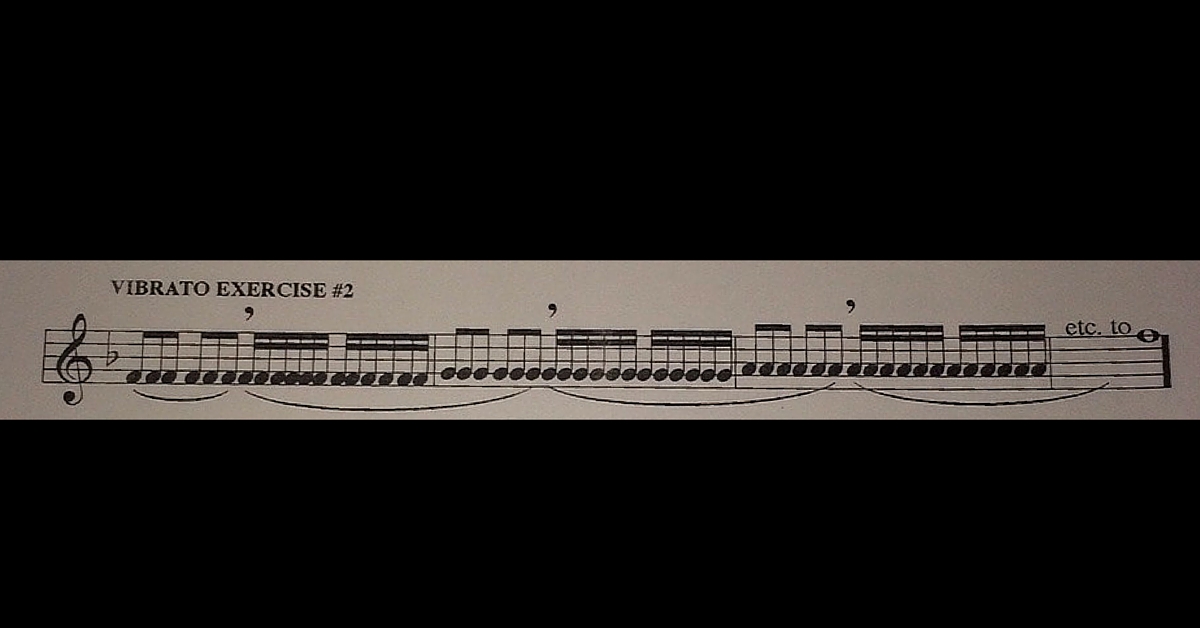
Start this after they are very confident on Vibrato Exercise #1. Exercise #2 will replace #1. Continue to emphasize all the points from Exercise #1 and be sure to do it daily.
Step 5 – Introduce “The Train”

This is in ADDITION to Vibrato Exercise #2. Do it daily (3 notes per day).
Each day have students pick 3 different note from the chromatic scale. They should play one from the lower range, one from middle, one from high (of the F 2 octave chromatic scale). Start with very VERY slow pulsing, speed up to as fast as possible, then slow back down gradually.
Students should take a breath and come back in as needed. because it’s going to last a long time. They will need to breathe if you do it as gradually as you should. You should ‘conduct’ the pulses to show them the speed increase/decrease. Take your time speeding up and slowing back down.
Step 6 – Transfer it to music
Find places in their music where they can play vibrato on one or two notes. For example, in their method book, most songs end on a half note, dotted half note, or whole note. Have them use vibrato when they get to the final note. They can even draw a little train squiggle above the long notes to remind them to play with vibrato. As they progress, teach them to look for other notes at ends of phrases where they can “do the train” and add vibrato.
Help students learn that the speed of the vibrato depends on the range of the note and where you are in the phrase. At the end of the phrase, you want to taper the vibrato before you end the note.
Other points to consider
– Demonstrating a great vibrato or playing recordings with great vibrato is a must.
– Ideally you would introduce all of these exercises in beginning band if you start 6th or 7th grade students and see them daily for 45-60 minutes per day.
How to pulse – as early as possible
Compound foot tap – well before introducing
Flute Vibrato Exercise 1 in October
Flute Vibrato Exercise 2 in January
The train in February
– If you are ‘behind’ on starting it’s ok – just start TODAY!
– If you have heterogeneous classes, just have the non-vibrato instruments play a whole note. It’s a great way to teach compound foot tap.
– You are getting double bang for your buck on the vibrato exercises because you are introducing the compound time foot tap.
– If you didn’t teach it in beginning band (perhaps you start in 4th grade or don’t see your students daily) either add to to your band warm-up or teach it during sectionals. (start TODAY!)
These steps should help simplify your method of teaching flute vibrato.
Related Reading:
Learning to Play the Flute in Tune (2 part series)
Rhythm Envelope Game for Beginning Band
A Note Before a Rest… (Quick Tip)
If you would like to receive our weekly newsletter, sign up here.
Don’t forget to like us on Facebook too!
Learn. Share. Inspire.
BandDirectorsTalkShop.com


Leave a Reply
You must be logged in to post a comment.