Clarinet is an instrument with many alternate fingerings and adjusted fingering options which can be overwhelming to students. It can also be overwhelming to band directors that do not have advanced experience playing the instrument. (After you read this article, print the free PDF hand out to give your students with the basic 4 rules.)
During times when you are helping a student choose the best clarinet fingering to use, you can arrive at the correct answer by following this process. As with anything, there are exceptions to these rules – especially when you get into high school level music and extreme key signatures. However if you use and teach this system as a basis, you can adjust as needed for tuning, tone and exceptions in special circumstances.

Rule #1 – Don’t slide
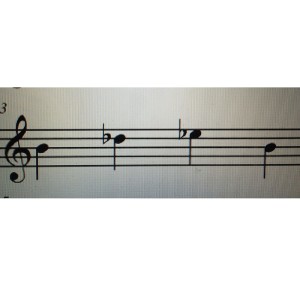
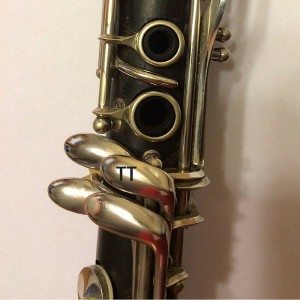
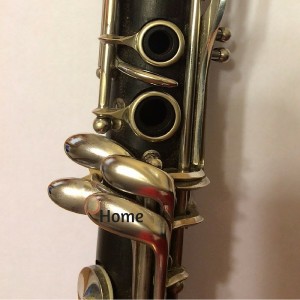
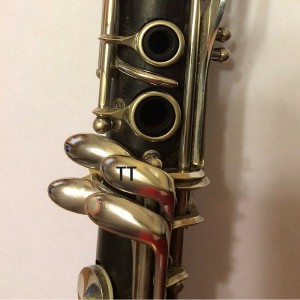
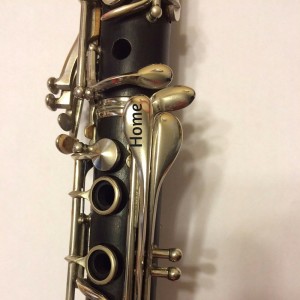
“Don’t Slide” example: If you have an Eb on the 4th space next to a C on the third space you would not slide from the Eb with the right pinky (I call this the TopTop key – top layer, top key) to the C with the right pinky (I call this the home key). Since there is no alternate for Eb, you would finger the Eb Right TopTop and the C on the Left Golf Club key. (I call this the ‘golf club’ key because it looks like a golf club.)

Instead –
Rule #2 – Don’t flip
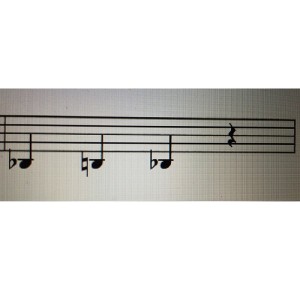
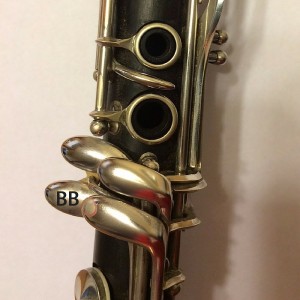
“Don’t Flip” example: You would not play a Bb below the staff with your 4th finger and then “flip” to B natural 5th finger. You would use 4th finger and what I call the ‘banana’ key. (also called the sliver or chromatic fingering)
Rule #3 – The TopTop key is King
Anytime the TopTop key (Ab/Eb key) is involved it must be fingered on the right. (Unless you have an additional left Eb key, but most students don’t. Even though a lot of my bass clarinet students do have them, we only use them when it avoids a slide.)
“TopTop Key is King” example: If you have a 4th space Eb next to a Db next to a B you must finger it Right TopTop, Left Outside and Right BottomBottom. So if the notes are B, Db, Eb the need to take the B on the Right BottomBottom to “prep” for the upcoming Eb. (Kids often do better coming away from an Eb than going to it. Have them mark R or L to help.)
Rule #4 – The Law of Minimal Motion
The less fingers and hands you involve the better.
“Law of Minimal Motion” Example – When you play first line E to first space F# you would use top F# because it only involves one finger (thumb) moving in one hand. You wouldn’t go to bottom 2 side keys and involve 2 hands – lifting the left 1st finger and adding the right finger on the side. That also makes you move your whole right hand out of position a bit (especially younger players with smaller hands). However, you have to follow these rules in order. So when you have that same E next to an F# next to an F natural, then you would use bottom 2 side keys for F# because Rule #2 is don’t flip. Going from Thumb F to Top F# would be a flip.
Most other decisions I make fall under the Law of Minimal Motion which is more of a philosophy than just one rule. For more information about this, read the “Law of Minimal Motion” post here. Another term I use often with students is that we want the most “efficient movement“.
What do I do when I have to break a rule?
Choose the lesser of 2 evils.
Sometimes you find yourself in a situation where you must flip or slide – maybe a D on the 4th line to an F# on the 5th line to an F on the 5th line. So you either have to flip from F# to F or slide from a D to the F# banana. Normally I’d say you would flip from F# to F. It’s more common for students to be able to flip more reliably than to slide reliably. The only reason I might not do that is if it’s slurred between the F#/F and is tongued between the D and F# to where you can slide right as you’re tonguing to try to hide it.
Also, if you have to slide (like 4th space Eb to Db, C, Eb) you want to slide downward. So I would do R,R,L,R. You would not want to do R,L,R,R. Sliding down is preferable to ‘hopping’ up.
I also look for consistency. In the all state music one year there was a pattern that was almost the same three times, but was slightly altered one of those times. I should have had the kids finger it the same each time even though one time it broke the rule of minimal motion. I didn’t catch it until we were weeks into preparation. Some kids switched, some left it. In hindsight it would have been better to do it the less efficient way because of the consistency factor.
When I have this situation I let the student decide. 99% of the time they have no choice. They must follow the 4 rules – like it or not. So on the few crazy fingering spots we come across where there is no perfect choice, I give them that control of choosing what works for them. I usually make them do it both ways a few times and tell them to work on it for a week and decide which one they like. Mark it in pencil just in case they change their mind.
Again, there are always exceptions, but with all the different fingering options on clarinet, I think students (and directors) find it comforting to know there is a method to the madness.
To review:
The first 2 are super simple. Don’t Slide. Don’t Flip.
The 3rd one makes sense once they do it a few times. TopTop Key is King.
The 4th one takes care of everything else. It’s really more of a philosophy. Law of Minimal Motion. (Read the full Law of Minimal Motion post here!)
When you have to break a rule, choose the lesser of 2 evils and do what works best for you.
Be sure you print this free 4RulesForBestClarinetFingeringHandout! You can post it in the band hall and give your clarinetists a copy.
CLARINET PODCAST & RESOURCE WEBSITE
A 1999 music education graduate of WTAMU, Tamarie Sayger held band director positions in Plano and Odessa, TX for 5 years. As a private clarinet instructor in Texas for 16 years, she has taught hundreds of students from grade 6-12 in classes, sectionals, and individual lessons. She has presented at district in-services and co-presented at the Texas Bandmasters Association convention. Her website, CrossingTheBreak.com, provides resources for clarinet teachers around the country. Mrs. Sayger is also a core contributor for BandDirectorsTalkShop.com, primarily on the subjects of clarinet and private lessons. Her podcast, Crossing The Break, can be found on iTunes.
Related Reading:
Teaching Clarinets to “Roll to A” Isn’t Enough (Also by Tamarie Sayger)
There’s a Time and Place for Every Fingering (Saxophone)
4 Clarinet Hacks – Better Clarinets in 30 Seconds
Clarinet Tips on 4 Important Topics
If you would like to receive our weekly newsletter, sign up here.
Don’t forget to like us on Facebook too!
Learn. Share. Inspire.
BandDirectorsTalkShop.com







Leave a Reply
You must be logged in to post a comment.