After teaching for over 13 years, taking many student teachers, and working with new teachers as colleagues, I began reflecting on my first few years as a teacher. It is hard as a new or even veteran teacher to focus on the small stuff and make it a priority. It is so easy to get into a routine of just “picking your battles,” as a means to get through the method book. If there is one piece of advice I could look back and give myself as a new teacher it is: “Do not pick your battles, pick EVERY battle!” Even the small battles are worth fighting with students – embouchure, hand posture, and more! Focus on even the smallest of details.
This may seems strange but now I would much rather get to only page 10 in the method books instead of page 20 if it means focusing on the small things! The method books do not teach it all, so supplementing becomes necessary. Here are suggestions of “small” things that can make a huge difference in your program and your students’ progress. I wish my earlier self spent more time focusing on these things daily!
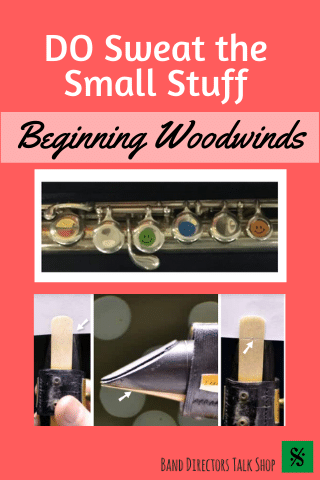
Flute Players
Start them on harmonic exercises EARLY in the year. I mean VERY early
- First, start on head joint only. After they make a sound on the head joint, have the student close the head joint with their hand to cover the opening, then have them change their aperture to get a high sound on the head joint alone. This will focus the embouchure and teach the students from the very first sounds to change their apertures. Students quickly learn how to firm their embouchure to reach higher pitches on the flute. Students should practice with a closed head joint going between the low and high harmonic pitches.
- (Here’s an article and video explaining more.)
- Additionally, as soon as students learn a G, start them on harmonic exercises, even if it is just for a G, on their flute! (G seems to be a relatively good starting point for student success.)
Make a BIG deal about their right thumb.
- Don’t allow the students right thumbs to stick out from under their flute. Encourage and hold them to high standards to pull their thumbs back! If they really struggle, consider having them purchase a fingering guide. Or putting a sticker on their flute where their right thumb should go. You can also place stickers on the thumb key, one on the stop where the right thumb should go, and one on the pinky key. (More details about hand position and flute hand position hacks.)
Head joint and tuner check
- Check their head joints making sure the head joint is seating. You can do this by closing the end of the head joint with your hand, then suck in on the tone hole with your entire mouth covering the tone hole, then quickly pull your hand off the opening, if you hear a POP then the head joint is seating, if you do not hear the POP, then you need to replace the cork in the head joint.
- Work with a tuner when they do harmonic exercises (unless they are using a “false” fingering when doing a harmonic on Eb) It will be WORTH your time.
Fingerings
- Place small stickers on the flute keys to show students where to place their fingers. Place one on the thumb key, one on the stop where the right thumb should go, and one on the pinky key.


Additional Ideas
- Consider purchasing a Pneumo Pro (or a few!) to help student learn where their aperture needs to change for the different octaves on flute.
Clarinet Players
Demand that they can get an F# on the mouthpiece and barrel.
- Send them home with tuners, have them download one to a computer or smart device.
Start them on “Pop ups” early!
- Just like with flute, I mean early. Can they hold the clarinet? Can they get an F# on the mouthpiece and the barrel? Can they successfully, with good tone, play a C? THEN START popups! The students do not need to be reading music, they just need to be able to adjust their thumb to use the register key.
- If they cannot play the “Pop up” from the C (which becomes a top staff G), then their embouchures are not set correctly and I would bet they cannot produce on F# on the mouthpiece and the barrel.
Embouchure Setting
- Place a piece of paper between the reed and the mouthpiece to see where the fulcrum – or meeting place of the reed/mouthpiece is. Draw a line and have students place that much mouthpiece into their mouth
- Make sure students are taking in ENOUGH mouthpiece. It will probably feel like too much.

- Make sure students are taking in ENOUGH mouthpiece. It will probably feel like too much.

Pay attention to supplies.
- Reeds matter. I am sorry, they do! Have harder or softer ones available. Have different brands available for students to try.
- Upgrade Mouthpieces. When financially possible, get them on a better ligature and a better mouthpiece!
- Put a Band-Aid on the students thumbs to start. Put the cushion side on the pad of their right thumb and have students place that against the clarinet with the clarinet resting on top of the thumb nail for problem placement. (More in this article.)
- USE a mouthpiece patch. I promise it is worth the $3.00 each student, or your program must spend (More in this article.)
Saxophone Players
This is similar to what we have already discussed with the clarinet students………
- You want to also utilize mouthpiece patches with your saxophone students.
Use a tuner, and use it often. Make sure students can get a G# on the mouthpiece with the neck.
Start the students doing octave exercises as soon as they are producing a good sound
- Have students hold and play a G, second line on staff, playing with a good full sound, and then add the register key. Checking the pitch with a tuner on both.
- Have students do this starting on low D, when they are ready and work chromatically up!
Saxophone Setup
- “Line the lines up.” Line up the line on the neck with the octave key! Then adjust the mouthpiece. Yes, that means your mouthpiece may “look” sideways but it will go straight into your mouth.
Fingerings
- Put small stickers on the top half of the saxophone keys to help students remember which key to “skip.”
Look for part 2 in this series – DO Sweat the Small Stuff – Beginning Brass/Percussion – coming soon!
Meghan Cabral teaches middle school band and works in Carmel, NY. Meghan is a Grammy Nominated Semi-Finalist, has written for many music publications including The Instrumentalist Magazine, NAfME’s Teaching Music, MEJ, NYSBDA’s Band Stand, as well as NYSSMA’s School Music News. Meghan is an active guest conductor as well as clinician for music departments and at state conferences. You can follow Meghan on twitter @band_mcabral, or instagram @band_cabral or contact her at anewbandapproach@gmail.com.
Related Reading:
Teaching Clarinets to Roll to A isn’t Enough
Beginning Oboe – The first sound
A Time and Place for Every Fingering (Saxophone)
BandDirectorsTalkShop is an Amazon affiliate. When you purchase through an Amazon link from this site a small percentage is returned to us to help us maintain and improve our site. We appreciate the support!
Learn. Share. Inspire.
BandDirectorsTalkShop.com


Leave a Reply
You must be logged in to post a comment.